Think Future Automation Generic System also known as TAGS is a generic framework which has been specifically designed to cater to needs of any client who seeks a low cost end-to-end test automation solution for web using open source tools.TAGS is designed in such a manner that the testers do not need to possess any scripting background at all to automate complex testing scenarios. Everything is already built-in and can be configured easily.
Primary characteristics of TAGS:
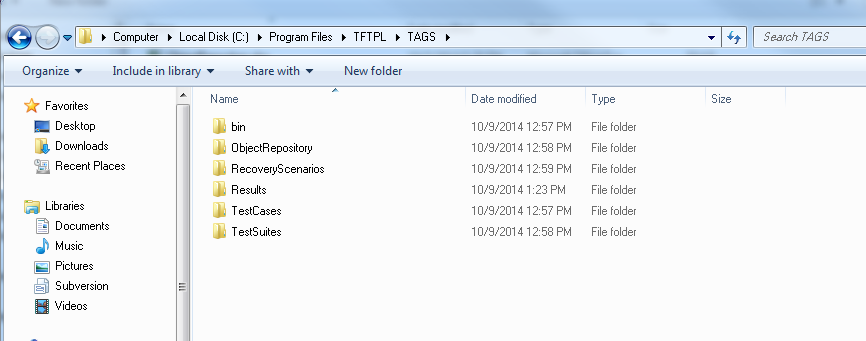
TAGS is composed of the following components:
As with Selenium and other automation tools testers need to know at least one of the supported language very well in order to automate your application successfully but with TAGS Framework testers don’t need knowledge of any programming language. TAGS Framework is designed in such a manner that the testers do not need to possess any scripting background at all to automate complex testing scenarios.Also Selenium does not have inbuilt reporting capability so testers need plugins like JUnit and TestNG for test reports. TAGS overcome this limitation of selenium with its Reporting Engine. It automatically generate reports/log files after execution of tests and also send Email Notifications.Selenium does not handle various browser pop-ups but TAGS provide various Recovery Scenarios to handle these pop-ups.
User need to download chromedriver.exe and placed at bin folder, user can see the list of driver with respective supported versions of chrome from Here default driver version is v2.10 placed at bin folder
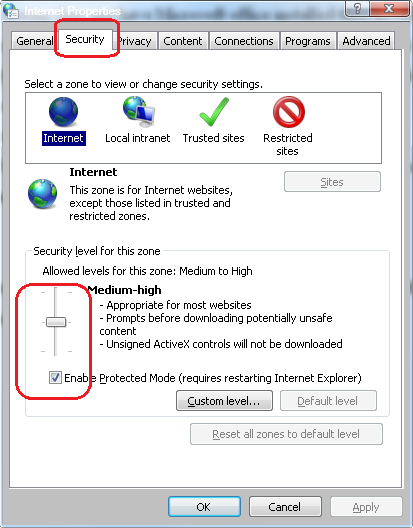
Version IE 11 only requires additional configuration, you will need to set a registry entry on the target computer so that the driver can maintain a connection to the instance of Internet Explorer it creates.
For 32-bit
Windows installations, the key you must examine in the registry editor is HKEY_LOCAL_MACHINE\SOFTWARE\Microsoft\Internet Explorer\Main\Feature Control\FEATURE_BFCACHE
For 64-bit
Windows installations, the key you must examine in the registry editor is HKEY_LOCAL_MACHINE\SOFTWARE\Wow6432Node\Microsoft\Internet Explorer\Main\Feature Control\FEATURE_BFCACHE Please note that the FEATURE_BFCACHE sub-key may or may not be present, and should be created if it is not present. Important: Inside this key. Create a DWORD value named iexplore.exe with the value of 0
How to do :
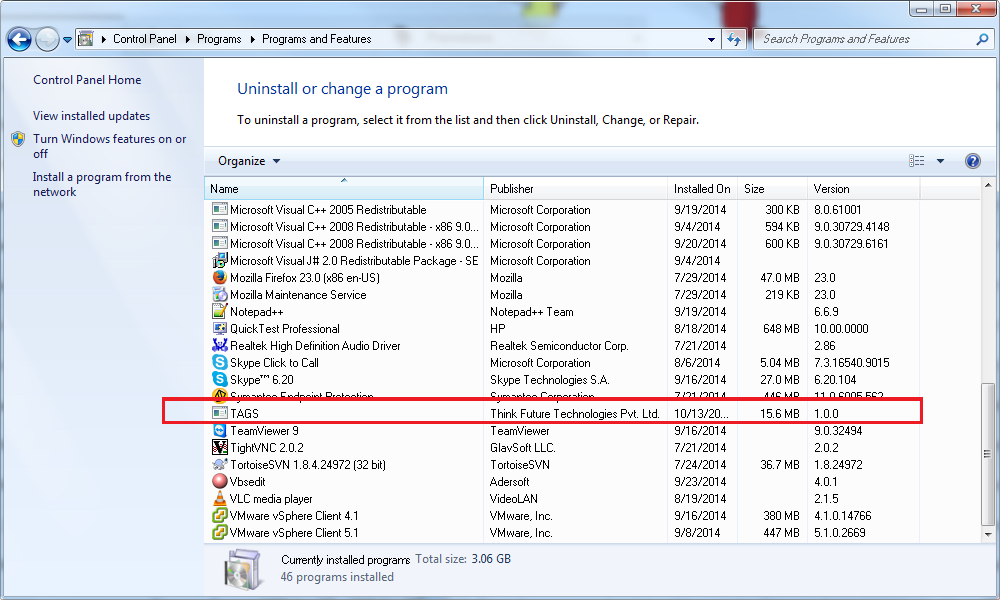
Note: If you installed 32 bit MS office on 64 bit Operating System then you must install 32 bit version of TAGS on that 64 bit OS.
Testing with TAGS involves 4 main stages:
Creating Tests
Configuring Test:
After writing your test cases and preparing object repository you need to configure your test cases. For configuration follow the steps given:
Running Test:
After configuring you can run your test by just running TAGS.exe file or double clicking tags shortcut on your desktop.
You can also set parameters by sending them through command line. E.g. C:>TAGS.exe testcaseid=abc.tc01
Analyzing Test Results:
After test execution completed reports are generated in the Results folder. Reports are generated in two forms
TAGS Reporting Engine automatically sends Email notifications
For Email notification user must change following parameters in “parameter.ini” file:
EmailNotification: true
Value of this parameter must be true.
EmailNotificationFrom: Specify the source email address.
EmailSMTPServer: Specify SMTP mail server (E.g. Smtp.gmail.com).
EmailSMTPPort:Specify SMTP Port number.
EmailSMTPUsername:Specify username for login.
EmailSMTPPassword: Specify password for login.
EmailStartTemplate: templates/StartTemplate.txt(inside templates folder) Specify the location of start template file. This template is used to create email at the start of test. User can change “StartTemplate.txt” file according to its needs. StartTemplate.txt file includes the following attributes:
[Test Cases]: Name of the test cases (For instance, ABCPhase2.01)
[Test Suite]: Name of the test suite (For instance, ABCPhase2)
[Name]: Name of the recipient.
[RemoteUrl]: URL of the remote machine on which the test case execution has started.
[StartTime]: Starting Time of execution.
EmailEndTemplate: templates/EndTemplate.txt(inside templates folder) Specify the location of end template file. This template is used to create email at the end of test. User can change “EndTemplate.txt” file according to its needs. EndTemplate.txt file includes the following additional attributes:
[Result]: Status of the Execution Report (It is either ‘Pass’ or ‘Fail’)
[Environment]: Testing environment (Environments can be QA1, QA2, or QA3)
[EndTime]: Ending time of execution.
[ExecutionTime]: Total time for execution.
Note: Variable enclosed in square brackets ( E.g.[Test Cases] ) in “StartTemplate.txt” and “EndTemplate.txt” are replaced by TAGS reporting engine at run-time.
For Sending mail user must give recipient names in EmailNotification.ini file. Description of EmailNotification.ini is given below:
EmailNotification.ini file:
This file includes the name and email id of the recipient.
Details of parameters within EmailNotification.ini file
The EmailNotification.ini file includes name of the recipient and the email id at which the notification is to be sent. The format is as follows: Recipient Name|Email ID
The recovery scenarios folder includes different scenarios that would come into play at the time of an unexpected exception or pop-up. That means, whenever a test step executes (like refreshing or navigating to another page), it verifies from the recovery files whether that particular object (any pop-up, modal, etc) has been identified on the screen or not (mentioned objects in the recovery files), if it finds, then it will automatically perform the defined actions against it.
Recovery is basically of two types:


There are only two .ini (Production.ini and QA.ini) files in which you can initialize parameters (ie : application url, object timeout etc)
You can even categories combinations of Test Cases (ie : Lets say few Test Cases user want to run under different condition (ie : QA) and few under another different condition (ie : Production)
There are only two .ini (Production.ini and QA.ini) files in which you can initialize parameters (ie : application url, object timeout etc)
How to use this feature :

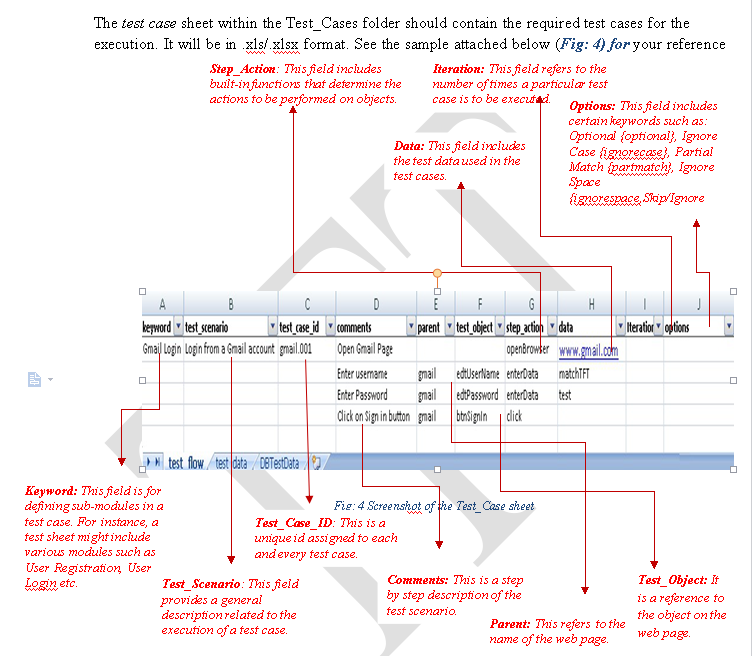
Test Case sheet is a spreadsheet used to write test cases. This sheet must be in specific format to successfully run the test cases. Format of spreadsheet is described below:
| keyword | test_scenario | test_case_id | comments | parent | test_object | step_action | data | Iteration | options |
The test_data sheet should include the required input data for test case execution. It includes the column name, row # and the data which needs to be entered while execution.
Iteration: To execute a test case multiple times with different data, it would be handled by Iterations method. It can be distinguished with unique row numbers. Like as shown below: if we’d like to enter Username as ‘matchtft’ & Password as ‘test’ then while execution in the iteration column of the test case sheet we would mention 1-1.
For eg: See the sample attached below (Fig: ) for your reference
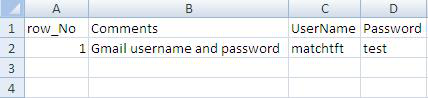
The Test Data sheet may include more than one sheet depending on test case requirements.
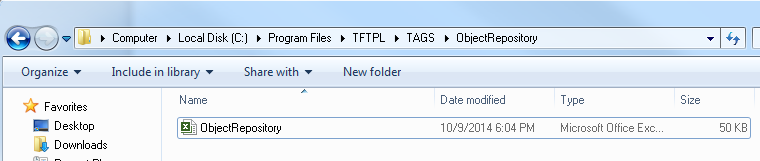
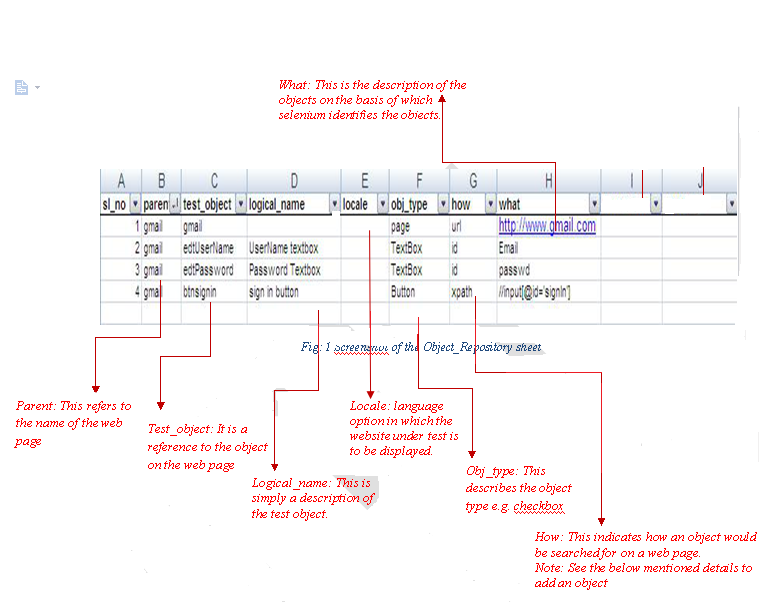
Object Repository spreadsheet is used to store all web objects which are used in your test cases. The format and brief description of spreadsheet is given below:
| sl_no | parent | test_object | logical_name | locale | obj_type | how | what | comments | mapping |
Basic purpose of this feature is to create single test case and use it where ever required
This can be achieved by two ways
Write Test Case within same Test Case sheet :
Create test case and use this with in the sheet by using TAGS keyword : runexceltestcase followed by Test Case Id.

Example :For booking of flight,status of flights,cancellation of flight and for more operations user need to login so we can write one single test case for login and use this test case where ever required.
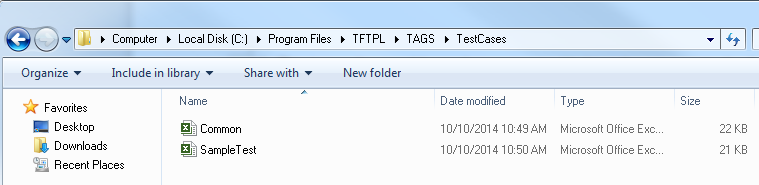
Create New Test Case file (ie : Common.xls)
This is some how similar to Test Case sheet, this sheet must be in specific format to successfully run the test cases. Format of spreadsheet is same as of Test Case sheet
How to use this feature :

| S.NO | KEYWORD | DESCRIPTION | PARENT | TEST OBJECT | DATA |
|---|---|---|---|---|---|
| BROWSER OPERATIONS | |||||
| 1. | openbrowser | Opens the browser. If used without the 'Test Data', it opens a blank browser. If used with 'Test Data', it opens the browser and navigates to the URL mentioned in 'Data Column'. | Test Data :- URL (optional) | ||
| 2. | clearbrowsercache | Clears the Browser cache | |||
| 3. | closebrowser | Closes the running Browser. | |||
| 4. | closeallbrowsers | Closes all the running Browsers. | |||
| 5. | refreshbrowser | Used to Refresh the Browser. | |||
| Navigational Keywords | |||||
| 1. | navigateurl | Used to Navigate to a specific URL given in 'Data Column'. | URL as Data | ||
| 2. | goforward | Used to Go to the next Page. | |||
| 3. | goback | Used to Go Back to the previous Page. | |||
| Web Form Operations | |||||
| 1. | clear | Used to Clear the text present in a text Box. | Need Parent | Need Test Object | |
| 2. | enterdata | Used to enter Text in the Text Box. The text to be entered is given in the 'Data Column | Need Parent | Need Test Object | Test Data |
| 3. | enteruniquedata | Generates and enters Unique Data in the given Object. The length of the Unique Data to be generated is given in 'Data Column' | Need Parent | Need Test Object | Length of Data to be generate |
| 4. | click | Used to Click on a specific Object. | Need Parent | Need Test Object | |
| 5. | check | Used to Check the CheckBox. | Need Parent | Need Test Object | |
| 6. | uncheck | Used to Uncheck the CheckBox. | Need Parent | Need Test Object | |
| 7. | selectitem | Used to select a specific option from a List. The Object is the locator of the list. The Option to be selected is given in 'Data Column'. | Need Parent | Need Test Object | Text of the item to be select in dropdown |
| 8. | selectmultipleitems | Used to select multiple item in multiple selection box | Need Parent | Need Test Object | Text of the items to be select seperated by comma |
| 9. | selectitembyindex | Used to select a specific option from a List. The Object is the locator of the list. The Index of the Option to be selected is given in 'Data Column'. | Need Parent | Need Test Object | index number of Item to be select |
| Wait Keywords | |||||
| 1. | wait | Used to pause the execution for a static time. The amount of time is mentioned in 'Data Column'. | Time should be in second in test data | ||
| 2. | waitforobject | Waits for particular Object to Appear. | Need Parent | Need Test Object | Time out in second(optional) |
| 3. | waitforobjectnotpresent | Waits for a particular Object to Disappear. | Need Parent | Need Test Object | Time out in second(optional) |
| 4. | waitforproperty | It waits for Property to appear. The property to wait for and the timeout is given in the 'Data Column'. Unit of timeout is seconds. Syntax -- property | timeout | Need Parent | Need Test Object | property | timeout in second |
| Alert Handling | |||||
| 1. | acceptalert | Accepts the Alerts.(browser Alert) | |||
| 2. | dismissalert | Cancels the Alerts.(browser Alert) | |||
| 3. | verifyalerttext | Verify text of the alert. The text to be verified is given under the 'Data Column'. | Text to be verify | ||
| Verify Keywords | |||||
| 1. | verifytextcontained | Verifies the text contained as a substring of a Word in the given Object. The text to be verified is given in the 'Data Column'. If it does not find the object in the 'Object Repository', it verifies the text (given in data column) to be present on the entire page. | Need Parent | Need Test Object | Text to be verify |
| 2. | verifytextnotcontained | Verifies the Text is not a substring of a Word in the given object. The text is given in the 'Data Column'. | Need Parent | Need Test Object | Text that verify as not present |
| 3. | verifytextonpage | Verifies that the specified text is present on current web page. The text to be verified is given in the 'Data Column'. | Text to be verify | ||
| 4. | verifytextnotonpage | Verify that specified text is not present on current web page. The text is given in the 'Data Column'. | Text that verify as not present | ||
| 5. | verifylistitempresent | Verify that List option is present in specified List object | Need Parent | Need Test Object | Text of item present in dropdown |
| 6. | verifylistitemnotpresent | Verify that List option is not present in specified List object | Need Parent | Need Test Object | Text of item not present in dropdown |
| 7. | verifyobjectpresent | Verifies that the specified test object is present on current web page. | Need Parent | Need Test Object | |
| 8. | verifyobjectnotpresent | Verifies that the object is not present on current web page. | Need Parent | Need Test Object | |
| 9. | verifyobjectproperty | Verifies a specific property of the given Object and matches it with specified value. Syntax - PropertyName | ValueOfProperty (To be given in 'Data Column'). | Need Parent | Need Test Object | PropertyName | ValueOfProperty |
| 10. | verifyobjectpropertynot | Verify the given property is not for Object | Need Parent | Need Test Object | PropertyName | Value Of Property that is not present |
| 11. | verifypageproperty | Verify page url \ title | url or title | ||
| 12. | verifytextinpagesource | Reads the html of the page, and searches for the specified 'text'. The text is given in 'Data Column'. | Text to be verify in page source | ||
| 13. | verifytextnotinpagesource | verify the Given Text is not present in page source. The text is given in 'Data Column'. | Text that verify as not present in page source | ||
| 14. | verifypagedisplayed | Verifies that the URL of page is as per the page object given in OR | Need Parent | Need Test Object | |
| 15. | verifyobjectdisplayed | Verifies if the object is being displayed or not on current web page | |||
| Database Operations | |||||
| 1. | executedatabasequery | Execute a data base query. The query is given in 'Data Coloum'. | Need sql Query | ||
| 2. | getdatafromdatabase | Get all the record from database using specified query | Need sql Query | ||
| 3. | getuserfortesting | Get all the record from database using specified query but if no record found then test will terminate instantly | Need sql Query | ||
| XML Operations | |||||
| 1. | findxmlattribute | To find a attribute in XML | attribute name | ||
| 2. | verifyxmlattribute | verify the Xml attribute is present | attribute name | ||
| 3. | countxmlnodes | Used to Find the Count of Given Xml Node | XML node | ||
| 4. | verifyxmlnodecount | Used to verify the Count of Given Xml Node | XML node | count | ||
| Events and Actions | |||||
| 1. | mousemove | To focus on Specific Object. To move the cursor to a specified Object. | Need Parent | Need Test Object | |
| 2. | mouseclick | To click on a Specific Object. | Need Parent | Need Test Object | |
| 3. | mouseover | To Hover the cursor on a Specific Object. | Need Parent | Need Test Object | |
| 4. | keypress | Used to press a Specific Key on a particular Object. The key to be pressed is given in 'Data Column'. | Need Parent | Need Test Object | Key name: e.g . ENTER |
| 5. | fireevent | Used to focus on an Object and perform an event mentioned in the 'Test Data' | Need Parent | Need Test Object | Test Data:- (Event name e.g. blur) |
| 6. | addaction | It saves an Action in an Array in the form of list. The action is given in the 'Data Column'. | Need Parent | Need Test Object | |
| 7. | performaction | It executes the list of actions saved in the add action list. | |||
| Miscellaneous | |||||
| 1. | runexceltestcase | Runs a particular test case. The test case ID to be run is given in the 'Data Column' | Test Data- (Test Case ID of the TestCase to run) | ||
| 2. | settestmode | Similar to If Else statements. It is used for AB Testing. It first checks which page is coming up and then performs an action corresponding to that page. | Need Parent | Need Test Object | <Mode Name> | value |
| 3. | getpageproperty | Stores the page Url/Title in a given variable. The variable is given in the 'Data Column'. ( | Variable to store and the url/Title (e.g url | <Variable> ) | ||
| 4. | executestatement | Execute a java script | Java Script | ||
| 5. | setvariable | It sets a value to a variable | <Varibale name> | value | ||
| 6. | setparameter | Used to override the Tags parameter at run time, it needs to put at first step of the test case in data column | <Tags parameter> | value | ||
| 7. | requestwebservice | Execute a API Query with specified Method | Api query | ||
| 8. | downloadfile | It downloads the file to a particular location in the System and save the location in a variable 'downloadedfile'. | |||
| 9. | ftpfileupload | It uploads a file to ftp server | Ftp server url | username | password | file path to be upload | ||
| 10. | generaterandomnumber | It generates a Random number . The limit of the random number is given in the 'Data Column'. | <lower limit> -<Upper limit> | ||
| 11. | generateuniquestring | It generates the unique String. The length of the string to be generated is given in the 'Data Column'. | Length of string to be generated | ||
| 12. | getobjectproperty | It extracts the value of the property of a particular object and puts it in a variable. | Need Parent | Need Test Object | <property name> | <variable name> |
The ReportSettings.ini file includes the text display settings for the execution report generated in HTML format.
Details of parameters within ReportSettings.ini file:
Experience hassle free code less test automation
TAGS is developed and maintained by Think Future Technologies Pvt Ltd.
If you need any support for implementing your test suites with TAGS.
